
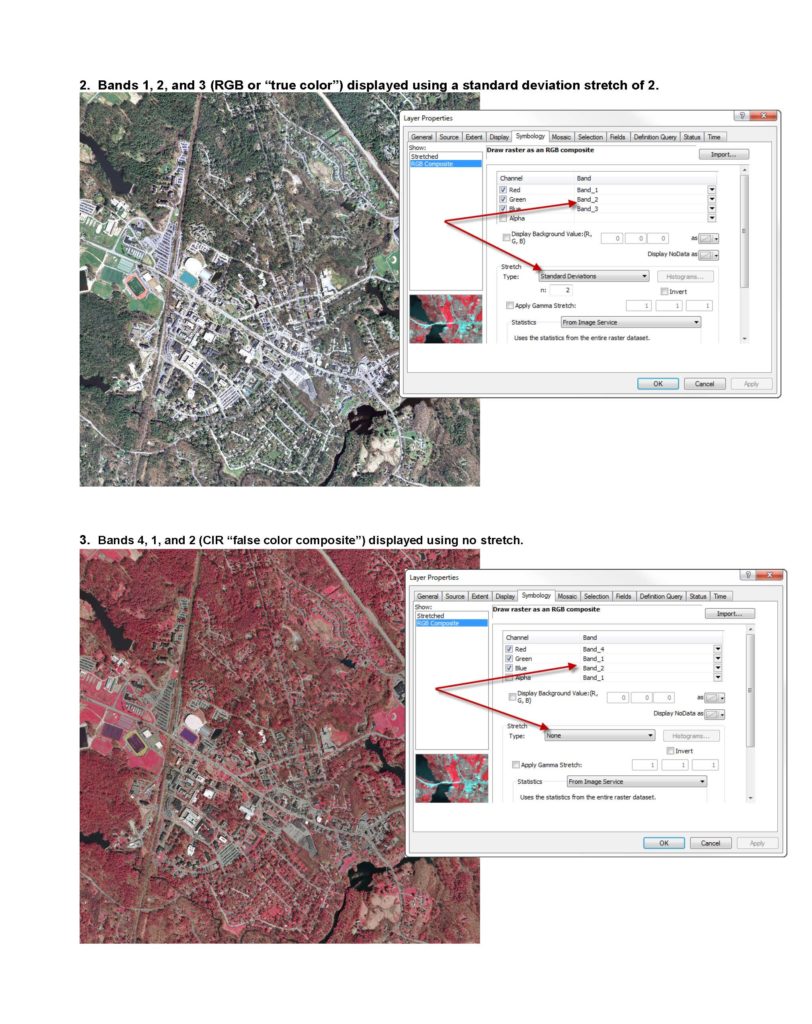
In January of 2019, we worked on a vegetation mapping project with Bobbie Webster and Oday Jeewan. Brown County’s orthoimagery from 2010 was an important source of information regarding the “before treatment” condition. The imagery was delivered to the County as a multiband dataset with color information organized per the standard used for vegetation mapping work:
- Band 1 – red
- Band 2 – green
- Band 3 – blue
- Band 4 – near infrared
This type of imagery allows users to discriminate among vegetation types based on reflectance in the near IR band. The standard method for utilizing the IR band for vegetation mapping has been around for years and is well described in an information sheet from the US Department of Agriculture. Their response to the question “How can a user change from natural color to CIR in the display?” is particularly relevant:
“The user must have software which will recognize all four bands. The software will usually have some type of interface where the band assignments can be changed. If an image is created with the red (wavelength) band as band 1, green as band 2, blue as band 3, and near infrared as band 4, a natural color display on the computer screen would be set up with the red (display) channel as band 1 (red), green channel as band 2 (green), and blue channel as band 3 (blue). CIR would be set up with the red channel as band 4 (NIR), the green channel as band 1 (red) and the blue channel as band 2 (green). Band 3 (blue) is omitted.”
Because the ArcGIS software suite is available to us here at UWGB, we have the ability to change band assignments as described in the paragraph above. However there is very little demand for the four band version of the imagery so the County Land Information Office did not spend the money to include the fourth band in the 2010 county-wide mosaic. To get the four band image for a particular location, users like us have to work with the raw imagery.
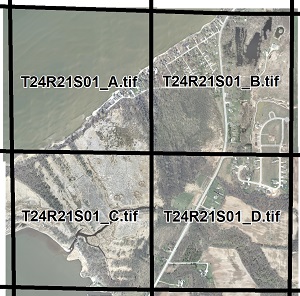
- The raw imagery consists of 2528 files, each covering one-quarter section. The file name is made from the town, range and section numbers plus a letter that distinguishes the quarters from one another. The file names for the four quarters in Town 24, Range 21, Section 1 are shown at right.
- The raw files are in the GeoTiff format, an uncompressed file type that results in really big files (~140 mb each).
- While the raw images appear to be correctly georeferenced (Brown County WISCRS), many of them are missing the coordinate system parameters that are typically embedded in the files by the vendor. When one of these incomplete files is added to an ArcMap session the Unknown Spatial Reference message will be displayed. The message is an indication that the image file needs to be repaired before the actual work of displaying the CIR image can continue.
Workspace Setup
A subfolder named TIF on an external drive has been designated as the workspace folder. It serves as the home location for files used and created in the course of the image conversion work.
- Working copies of the 2528 raw Geotiff files is copied into the subfolder at the beginning of the job
- A workspace map document (.mxd extension) is created at the beginning of the job. In this case we’re calling it _MakeCIR.mxd
- A new layer file (.lyr extension) is created in the workspace folder each time one of the raw image files is processed.
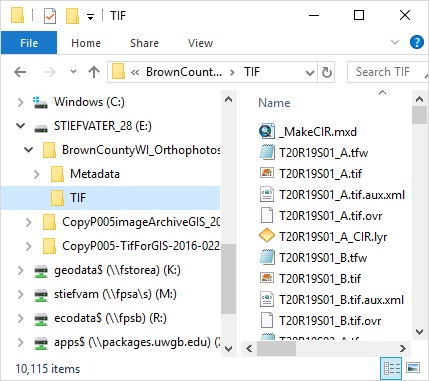
The first raw image in the workspace folder is T20R19S01_A.tif. The screen shot shows the workspace folder tree after the CIR image corresponding to that first GeoTiff has been created. The information for the newly created CIR image is stored in a layer file titled T20R19S01_A_CIR.lyr. The steps listed below will track the creation of the CIR images corresponding to the rest of the raw image in the workspace folder.
Check and Repair the Source Image File
This write up assumes that the workspace map document is already open on the desktop:
- Remove any image layers left in the Table of Contents from earlier image conversion operations
- Add the next raw image file to the workspace map document’s data frame.
- ArcMap will automatically check the newly added image file for the presence of pyramids. If pyramids are not present and ArcMap thinks that adding them will make a significant difference in display speeds, a Create pyramids for …… dialogue will be displayed. At the Biodiversity Center we always say “Yes” to pyramids.
- ArcMap will automatically check the newly added image file for the presence of spatial reference information. We know the imagery that is the subject of the case study uses the WISCRS coordinate system for Brown County as its spatial reference but we’ve noted that the necessary information is missing from some of the image files. The need to repair an image file’s spatial reference becomes apparent when adding it to the ArcMap data frame triggers the Unknown Spatial Reference error message.
- Once it’s been determined that a file needs repair, the error message is closed and the repair work is done in ArcToolbox at Data Management Tools/Projections and Transformations/. Selecting Define Projection, then Coordinate System, then Projected Coordinate Systems, then County Systems, then Wisconsin CRS, then NAD 1983 (2011), then US Feet, then NAD 1983 (2011) WISCRS Brown (US Feet) updates the image file with the necessary spatial reference info.
Once the necessary repairs have been made to the image file, the work of creating the CIR image can proceed.
Display the CIR Image
The next steps assume that the workspace map document is already open on the desktop, that the source image has been added to the data frame and the image file has been checked and repaired as described above. The process of reassigning the color bands to produce the CIR version of the image is well-described in a tutorial published by the Earth Systems Research Center at the University of New Hampshire (annotations in red by Mike Stiefvater):
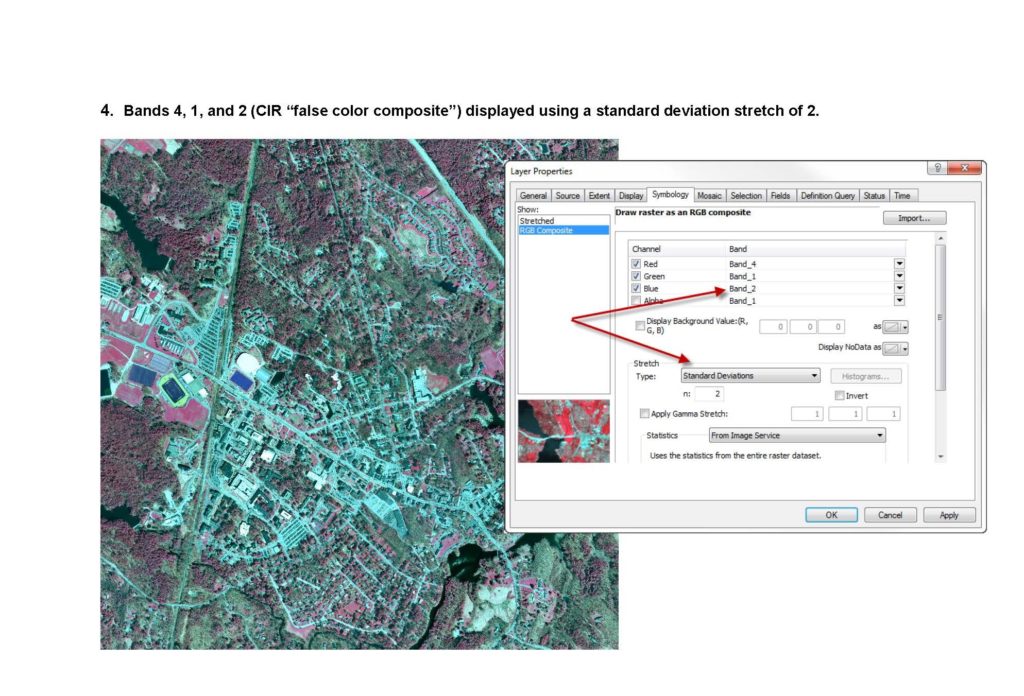
If everything works as it’s supposed to, the image displayed in ArcMap has the characteristics of a CIR image – vegetation is tinted red and the stronger the tint, the healthier the vegetation. It’s important to remember that the band assignments that produced the CIR image are stored in the map document file. That means that the CIR image would have to rebuilt from scratch to display in a different map document.
Save the CIR Image for Use in Another Project
The next steps assume that the workspace map document is already open on the desktop and the newly created CIR image is displayed in the data frame:
- Right click on the image file’s name in the Table of Contents and select Save as layer file…
- Save the new file (which will have an .lyr extension) to the workspace folder using the same name as the source file and adding the suffix “_CIR”.
Using the .lyr file should allow the CIR to be added to a map document without having to reassign the color bands each time.
Test the New Layer File
The next steps assume that the workspace map document is already open on the desktop and the newly created CIR image (.lyr extension) has been saved to the workspace folder.
- Remove all image layers from the Table of Contents and save the map document.
- Add the new layer file back in to the data frame.
If the CIR version of the image is displayed without having to reassign color bands, the conversion has been successful.