
Example – DIY Spatial Data Table
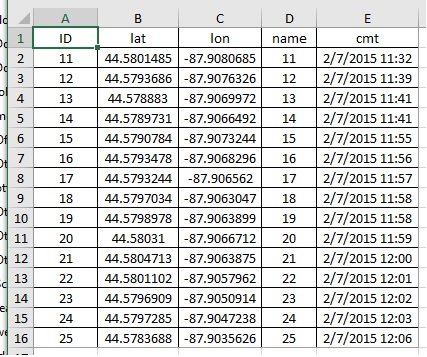
Data tables that include coordinate values for each data point are common in natural resources work. There are several methods available to get data organized in this way to function as a layer in ArcMap. The method described in this article results in creation of a point feature class. It’s a little more complicated than alternative approaches but has the benefit of being self-documenting. We’re using some old muskrat lodge data to illustrate the method. The source data table is shown at right.
Note that the example table employs geographic coordinates (latitudes and longitudes) to define the locations of the data points. The procedure described in this article is specifically tailored for lat/long coordinate pairs and can’t be applied to a table whose coordinates are projected rather than geographic. As of September 1, 2018 the article that addresses tables that employ projected coordinates is still in the works.
NEWBIE ALERT !! – the geoprocessing operation described in this article is a source of endless frustration for newbies. The ArcMap interface could easily have been designed so a person with a superficial knowledge of coordinate systems could successfully add a spreadsheet to a map document. But noooooooo. The way that coordinate system information is plugged in is completely bass-ackwards. The result is a process that even experienced users sometimes have trouble with. To avoid this well-known issue, users should read and follow the steps carefully.
Select or Create a Project Folder (File Explorer) – If you are using standard project management practices, you already have a set of top-level (project) folders on the drive you use for GIS work. It’s great if the task at hand fits nicely in to an existing project. If not, create a new project folder now. We’ll be developing our example on our faculty M: drive in an existing project folder named GisDemo.
Create a Workspace Folder (File Explorer) – A dedicated subfolder will be needed to store the source file and the file(s) that will be derived from it.
- Use Windows File Explorer to create the workspace folder as a sub under the project folder. For our example we added a subfolder named gisdemo201808_FeatClasFromLatLonTable to our GisDemo project folder
- Move the source file into the workspace folder. The source file in our example is named PtSableMuskratLodgeGps.xls.
Make a Working Copy of the Source File – The process assumes that you will be making some changes to allow the table to be read by ArcMap. Good practice requires that you make these changes in a working copy of the source file rather than in the source file itself. That way, if something goes wrong, you can return to a completely clean version of the data.
- Open the source file in Excel. If it’s a .csv or a worksheet in an Excel workbook, there’s nothing to it. If it’s a delimited text file, a Word document, a pdf or some other non-Excel format, you may need some advanced Excel skills to open it. That’s sort of the way it is.
- Once the source file is open in Excel, select “File-Save As” and browse to the workspace folder.
- Enter an informative name in the “File name:” input box. For our example we used MuskratLodgeWork01.xls
- Select Excel 97-2003 Workbook (*.xls) in the “Save as type:” input box
- Click on the Save button. Most of the time this will close the source file and open the working file so you can prepare it for the conversion.
- Occasionally clicking on Save activates a message reminding you that you are using an earlier version of Excel. If that happens, click on the Continue button.
The working copy of the data (in the 97-2003 file format) should now be open in Excel.
Fix the Field Names For the Latitude and Longitude Columns – Start by making sure you understand which columns in the table contain the latitude and longitude values. The data author’s field names (value in table row 1) may be specific enough to remove any doubt (like “LATITUDE” for example). But that won’t always be the case. Terms such as “Y”, “Y_FIELD” or “NORTHING” are sometimes used in place of “LATITUDE”. Terms such as “X”, “X_FIELD” or “EASTING” are sometimes used in place of “LONGITUDE”. So you need to learn to recognize latitudes and longitudes by looking at the way the data values are structured. You also need to check for the surprisingly common situation where the coordinate pair values are backwards (latitude values in the longitude column and vice versa). Once you figure out how the table is structured, change the field names if:
- The change is needed to clearly and correctly identify which columns are which.
- The change is needed to achieve compliance with shapefile field naming rules.
Save the file and continue.
Fix Coordinate Pair Notation Issues – Correct the notation of the values in the latitude and longitude columns so the spatial information they contain can be read by ArcMap. If the coordinate values are written in degree-minute or degree-minute-second notation, replace them with the equivalent decimal degree values… SEE MORE
Save the file and continue.
Fix Coordinate Pair Syntax Issues – Correct the syntax of the values in the latitude and longitude columns so the spatial information they contain can be read by ArcMap. This primarily consists of removing non-numeric characters:
- Remove the ” ° ” symbol (or the word “degree”) where it has been used to indicate that coordinates are geographic … SEE MORE
- Remove the letter “N” where it has been used to indicate that a latitude is in the northern hemisphere.
- Remove the letter “S” where it has been used to indicate that a latitude is in the southern hemisphere. Insert a minus sign ahead of the numeric value … SEE MORE
- Remove the letter “E” where it has been used to indicate that a latitude is in the eastern hemisphere.
- Remove the letter “W” where it has been used to indicate that a latitude is in the western hemisphere. Insert a minus sign ahead of the numeric value … SEE MORE
Save the file and continue.
Fix the Field Names For the Non-Spatial Table Columns – So far you’ve checked the field names for the latitude and longitude columns. The other field names in the table need to adhere to shapefile field naming rules as well. Correct the field names as needed, save the file and continue.
Identify the Input Coordinate System – A few steps down the road, you will be asked to furnish the name of the coordinate system associated with the values in the latitude and longitude columns. The possibilities are generally limited to WGS 84, NAD 1983 or NAD 1927. If the author followed good practice, the name of the GCS used is somewhere in the data file.
- Some authors create a multiple-sheet workbook with one sheet devoted to metadadata
- Some authors insert the coordinate system information as a note above or below the main data table
- Some of us prefer to use the field names to embed coordinate system information directly in the data table. For example, when making a table that includes WGS 1984 latitudes and longitudes we name the coordinate columns “LAT_WGS84” and “LON_WGS84” respectively.
If you find the name of the coordinate system, great. Hang on to it for use in the file conversion process. At this point you’ve learned as much as you can from the source data, so close Excel and continue.
Create a Dedicated Map Document – Open ArcMap and save the map document file (.mxd) to the workspace subfolder. In the example, we named it latlon2shp.mxd
Prepare the Workspace – Use the Catalog window in ArcMap to:
- Confirm that the working version of the data shows up in the ArcCatalog folder tree. In our example, that’s the file MuskratLodgeWork01.xls .
- If you intend to create the new feature class in an existing file geodatabase, make sure you know its name and location in the folder tree
- If you intend to create the new feature class in a file geodatabase that doesn’t exist yet, you need to create that geodatabase now. Again, it’s important to keep track of its name and location in the folder tree.
- If you intend to create the new feature class using the old shapefile data format, no additional preparation is needed. That’s the approach we intend to use for our muskrat lodge example.
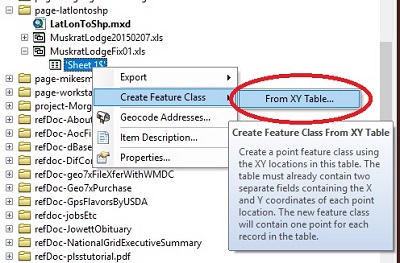
Create the New Feature Class – Geoprocessing Operations – The geoprocessing tools used to create the new feature class are accessed by right-clicking on the corrected spreadsheet’s listing in the ArcCatalog folder tree, then selecting “Create Feature Class”, then “From XY table…”.
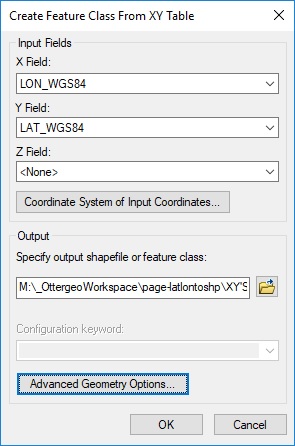
Create the New Feature Class – “X Field:” Input Box – The program should already have filled in the box with the name of the longitude field. If it has guessed correctly, move on to the next item. If not, find the correct field name from the list.
Create the New Feature Class – “Y Field:” Input Box – The program should already have filled in the box with the name of the latitude field. If it has guessed correctly, move on to the next item, If not, find the correct field name from the list.
Create the New Feature Class – Coordinate System button – This is where the coordinate system information figured out earlier gets attached to the new feature class. In the “Create Feature Class From XY Table” window, clicking on the “Coordinate System of Input Coordinates…” button displays the Spatial Reference Properties dialog. Use the dialog to tell ArcMap the name of the coordinate system used by the author of the data table.
- More often than not it’s WGS 1984 which is input by selecting Geographic Coordinate Systems, then World, then WGS 1984.
- The most common alternative to WGS 1984 is NAD 1983 (Geographic Coordinate Systems, then North America, then NAD 1983)
- NAD 1927 is another possibility (Geographic Coordinate Systems, then North America, then NAD 1927)
Clicking on the OK button in the Spatial Reference Properties dialog attaches the chosen coordinate system to the feature class and redisplays the “Create Feature Class From XY Table” window.
Create the New Feature Class – “Saving Data” Window – In the “Create Feature Class From XY Table” window, clicking on the folder icon to the right of the input box titled “Specify output shapefile or feature class” displays a “Saving Data” window.
- Select the preferred feature class type from the Save as type: input box. For our example we chose the “Shapefile” option.
- Browse to the workspace folder. In the Name: input box, enter the name you’ve chosen for the feature class. For our example we chose the name MuskratLodge.shp.
Items Below The Line Are Under Construction – Return to Top of Page
In natural resources work, it’s pretty common to receive spatially referenced data in the form of an Excel spreadsheet with columns listing the latitude and longitude of point observations. This Otter Geospatial RefDocs article describes a procedure for creating an ArcMap-compatible feature class from an Excel spreadsheet.
NEWBIE ALERT !! – the geoprocessing operation described in this article is a source of endless frustration for newbies. The ArcMap interface could easily have been designed so a person with a superficial knowledge of coordinate systems could successfully add a spreadsheet to a map document. But noooooooo. The way that coordinate system information is plugged in is completely bass-ackwards. The result is a process that even experienced users sometimes have trouble with. To avoid this well-known issue, users should read and follow the steps carefully.
Prepare the Workspace – In this write-up we’ll be referring to the original Excel spreadsheet as the “input file”. To illustrate the process we’re using a table of muskrat lodge data as the input file. The original filename is MuskratLodge2015. These first steps are performed in Windows File Explorer.
- Make a new folder for the input file and the file(s) that will be created from it. In the example we’ve named the folder ExcelToFeatClasWorkspace.
- Copy the input file to the workspace folder
Make a Working Copy of the Original Excel File – When data needs to be edited to make it useable, it’s good practice to retain a copy of what you started with. Also, ArcMap can’t read 64-bit Excel files (.xlsx extension). Performing the copy operation described here assures that the data is in Excel’s 32-bit format (.xls extension) and can be read by ArcMap.
- Open the input file in Excel
- Open the File-Save As window and browse to the workspace folder
- Enter an informative name in the File name: input box. For our example we used MuskratLodgeFix01
- Select Excel 97-2003 Workbook (*.xls) in the Save as type: input box
- Clicking on the Save button initiates a number of events. The input file is closed. The working copy of the input file is created and opened. A message warning of “Significant loss of functionality” may or may not be displayed depending on the architecture of the input file. It’s not an indication of anything wrong.
So Excel is still open and the checks and corrections described below will be recorded in the working copy of the data. Before moving on, this would be a good time to read up on shapefile field names.
Review and Clean Up the Column Containing Latitude Values – Make sure you understand which column contains latitude values. It’s really helpful when the field name (the value in the first row) is “Latitude” or something similar, but that won’t always be the case. The latitude may also be called the “Y” field, another attempt by Esri to confuse newbies. Once you are certain you’re looking at the latitude column, fix the values as follows
- Check the field name (value in the first row) for compliance with shapefile field naming rules. Correct the field name as needed and make a note of the fixed field name (you’ll need it for a subsequent operation).
- Check the data values (rows 2 and up). If the latitude values are written in degree-minute or degree-minute-second notation, replace them with the equivalent decimal degree values.
- Check the data values (rows 2 and up) for non-numeric characters. Strip out non-numbers such as the word “degree”, the ” ° ” symbol, alpha characters “N”, “S”, “E” and “W” as hemisphere indicators. The only non-number allowed is the leading minus sign that precedes southern hemisphere latitudes
- Save the file but don’t close it at this time.
Review and Clean Up the Column Containing Longitude Values – Make sure you understand which column contains longitude values. It’s really helpful when the field name (the value in the first row) is “Longitude” or something similar, but that won’t always be the case. The longitude may also be called the “X” field, another attempt by Esri to confuse newbies. Once you are certain you’re looking at the longitude column, fix the values as follows
- Check the field name (value in the first row) for compliance with shapefile field naming rules. Correct as needed and make note of the final field name (you’ll need it for a subsequent operation).
- Check the data values (rows 2 and up). If the longitude values are written in degree-minute or degree-minute-second notation, replace them with the equivalent decimal degree values.
- Check the data values (rows 2 and up) for non-numeric characters. Strip out non-numbers such as the word “degree”, the ” ° ” symbol, alpha characters “N”, “S”, “E” and “W” as hemisphere indicators. The only non-number allowed is the the leading minus sign that precedes western hemisphere longitudes. That’s us by the way.
- Save the file but don’t close it at this time.
Review and Clean Up the Data Columns – This step is different for every job depending on the content and formatting of the tabulated data. The same general procedure is applied to each column.
- Make sure you understand the function of the column under review. If the data it contains is completely useless, delete it
- Check the field name (value in the first row) for compliance with shapefile field naming rules. Correct as needed.
- Save the file but don’t close it at this time.
Determine the Coordinate System of the Input Coordinates – The fact that the author of the data file used latitudes and longitudes to define the locations of the observations has already been noted. That’s why this set of instructions was chosen over the one that applies to locations expressed as linear displacements. So we know that we are dealing with a geographic coordinate system or “GCS”. The GCS we see most often in our work is WGS 1984, followed in frequency by NAD 1983. NAD 1927 shows up occasionally with older US Forest Service data. So how do we know which GCS applies to the data file we are working with? If the author followed good practice, he/she included the name of the coordinate system in a separate metadata file or placed it somewhere in the data file itself.
- Some authors create a multiple-sheet workbook with one sheet devoted to metadadata
- Some authors insert the coordinate system information as a note above or below the main data table
- Some of us prefer to embed coordinate system information directly in the data table by using informative field names. When making a table that includes WGS 1984 latitudes and longitudes we name the coordinate columns “LAT_WGS84” and “LON_WGS84” respectively.
If explicit Coordinate System information has not been furnished (a VERY common occurrence), WGS 1984 is a pretty safe assumption. We’ve now obtained all we need from the working copy of the input file so we can close Excel.
Create a Point Feature Class From the Corrected Spreadsheet – The following operations are performed in ArcMap in the folder that was chosen earlier for creating the new feature class.
- Confirm that the corrected version of the input file shows up in the ArcCatalog folder tree. In our example, that’s the file MuskratLodgeFix01.xls .
- If the new feature class will be created in an existing file geodatabase, we need to make sure we know its name and location in the folder tree
- If the new feature class will be created in a file geodatabase that doesn’t exist yet, we need to create that geodatabase now. Again, it’s important to keep track of its name and location in the folder tree.
- If the new feature class will be created using the shapefile data format, we don’t have to fool around with a target geodatabase. That’s the approach we intend to use for our muskrat lodge example.
- The sequence used to display the dialogue titled “Create Feature Class From XY Table” is illustrated by the screen shot above right. It starts with right-clicking on the corrected spreadsheet’s listing in the ArcCatalog folder tree, then selecting “Create Feature Class”, then “From XY table…”.
The steps listed below refer to the “Create Feature Class …” dialog which is now displayed in ArcMap. The values that the dialog is asking for have all been worked out in earlier steps.
- The input box titled “X Field:” looks at the field names in the corrected version of the input file and tries to figure out which one lists the longitude values. If it has guessed correctly, move on to the next. If not, find the correct field name from the list.
- The input box titled “Y Field:” looks at the field names in the corrected version of the input file and tries to figure out which one lists the latitude values. If it has guessed correctly, move on to the next. If not, find the correct field name from the list.
- Clicking on the “Coordinate System of Input Coordinates…” button displays the Spatial Reference Properties dialog. Use the dialog to tell ArcMap the name of the coordinate system of the latitude and longitude values listed in the table. More often than not WGS 1984 is the correct response which is input by selecting Geographic Coordinate Systems, then World, then WGS 1984. Common alternatives to WGS 1984 include NAD 1983 (Geographic Coordinate Systems, then North America, then NAD 1983) and NAD 1927 (Geographic Coordinate Systems, then North America, then NAD 1927)
- Clicking on the folder icon to the right of the input box titled “Specify output shapefile or feature class” displays a “Saving Data” window
Use the saving Data window to specify the name and type of feature class that will be created.
- Select the preferred feature class type from the Save as type: input box. For our example we chose the “Shapefile” option.
- Enter the name you’ve chosen for the feature class in the Name: input box. we chose the name MuskratLodge for our example.